RoboCode
Help Page
Table of content
- Programming
- Open programmer
- Types of code blocks
- Instructions
- Values
- Run program
- Blocks documentation
- Game modes
- Campaign
- Playground
- Processor
- Binary pins bindings
- Analog pins bindings
1. Programming
1.1. Open programmer
- Campaigns - click button in the top-right corner,
- Non-campaigns - click on the robot you want to program.
1.2. Types of code blocks
Different types of blocks have different colors and styles to help recognize them.
1.2.1. Instructions
Instruction blocks have flat color style and are executed one by one, just like a lines of code.
| Block / description | Example |
| Instruction Basic instruction that executes a single command like "move forward" or "set IO value". Instruction is similar to a single line of code that is executed. | 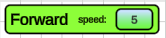 |
| Composition May contain any number of instructions inside. They are used to create loops or conditional execution of the set of instructions. Note that every composition is also instruction and can contain compositions inside. | 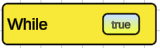 |
| Decorators Decorators are similar to compositions but can contain only one instruction. | 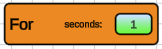 |
1.2.2. Values
- Value blocks or slots have gradient with different colors,
- value block can be put to the value slot of the same type (same color),
- value blocks can have value slots parameters (for example, a+b operation takes two values and returns sum).
| Value / description | Example |
| Floating point value/slot Represents any value. Can be used as instruction parameter like speed or output from components like distance sensor or servo motor position. |  
|
| Boolean value/slot Represents logical value (true or false). Can be used as conditions or reading from components like buttons (pressed/released) or line sensor (line detected/not detected) |   |
1.3. Run program
- Put instructions inside the Program block,
- Click Program in the top-right corner of the programer,
- Close progammer,
- In the top-right corner click Run to start executing code and Stop to stop it
1.4. Blocks documentation
Possible values of instruction parameters depends on the robot or the component that reads value but usually it is value between -100 and 100, and represents percentage of the minimum/maximum possible values.
| Block | Description |
| Move forward Result of this instruction depends on the robot that executes it but generally speaking, executing this instruction repeatedly will cause robot to constantly move forward. Only Car and Drone support this instruction. Instructions: Right, Turn, Up are analogical to the Forward instruction. |
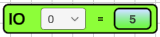 | Set analog IO value Sets output of the specified analog IO pin. Component that is connected to this pin will receive this value. It may be used to control motor's speed or servo motor's angle. |
 | Set binary IO value Sets output of the specified binary IO pin. Component that is connected to this pin will receive this value. It may be used to control LED. |
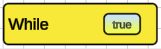 | While loop Executes all instructions inside, from top to bottom. Whole sequence is repeated as long as condition parameter is true. |
 | If Executes all instructions inside, from top to bottom, only if the condition parameter is true. If not, the whole If block i skipped. |
 | For seconds Executes instruction inside repeatedly for a specified number of seconds. If there is no instruction inside, it works just like a delay. |
| Analog IO value Reads value from the component connected to the specified analog IO. This can be distance sensor reading, servo motor's angle, etc |
| Binary IO value Reads value from the component connected to the specified binary IO. This can be line detector's state, button's state, etc |
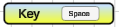 | Input key Reads state (pressed / released) of the specified keyboard key. To change the key, click on the button with the key's name and then, press the keyboard key you want to use. |
 | Input axis Reads state of the virtual input axis. Value is between -1 and 1. There are multiple axes bound to the different keys: Horizontal 1 / Vertical 1 - WSAD, Gamepad left stick Horizontal 2 / Vertical 2 - Keyboard arrows, Gamepad right stick, Left / Right Trigger - Left/ Right gamepad's trigger |
2. Game modes
2.1. Campaign
In campaign modes, the goal is to make robot reaches the green area. Easier levels has prepared set of instructions that are needed to complete the task.
2.2. Playground
In this mode, there is no any task to complete. You can program each robot, test it and play around with it.
2.3. Processor
This mode is similar to playground, there are no any tasks to complete. You can program the microcontroller to play around with it, learn how to use microcontroller's GPIOs.
Processor on the scene has component around it bound to the GPIOs:
2.3.1. Binary pins bindings
- 0 - Red LED
- 1 - Yellow LED
- 2 - Green LED
- 3 - Blue LED
- 4 - Button 1
- 5 - Button 2
- 6 - Button 3
- 7 - Button 4
2.3.2. Analog pins bindings
- 0 - Servo motor 1
- 1 - Servo motor 2
Leave a comment
Log in with itch.io to leave a comment.